Facebook advertising is clearly a key marketing channel. However, not all store owners are aware of how powerful it is.
That’s what we’ll be getting into today. In this article (updated for 2021), we’ll find out how to integrate Facebook Pixel to Shopify. We’ll also give you 3 killer hacks to earn more conversions using Facebook pixel.
Let’s dive in!
How to add Facebook Pixel to Shopify?
Step 1: Create a Facebook Ads account
Step 2: Access Events Manager
Step 3: Adding an Event
Step 4: Click on Install code manually
Step 5: Copy the code
Step 6: Head back to Shopify’s admin panel
Step 7: Click on Set up Facebook
Step 8: Hit the green Add sales channel button.
Step 9: Connect your Facebook account to Shopify
Congratulations! Now your Facebook Pixel ID has been added to all the pages on your Shopify website.
? Tip for you: In the drop-down menu Data sharing, you will see three levels to choose from. Make sure you enable the Maximum level. That way, customer data will allow for much better attribution.
How to test Facebook Pixel in Shopify?
Now that you’ve installed Facebook Pixel, you’ve got to make sure it is working correctly. The simplest solution is utilizing Facebook Pixel Helper extension.
Once you’ve installed it, on the top of the web browser, you can see the extension icon as such. If you click on it, the Facebook Pixel Helper plugin will pop up with the diagnosis for the specific page.
Then depends on what events you’ve set up, try to recreate the action to see whether the event fires properly or not.
Additionally, if the Facebook Pixel is not working on Shopify, an error notification will appear. At this point, you might see error messages such as No pixels found.
This means you haven’t successfully installed Facebook Pixel to Shopify. Go back and install the Facebook pixel again, and make sure you’ve saved the pixel on Shopify before navigating away.
(Don’t forget to also check out how to integrate Google Analytics with Shopify if you haven’t done so)
How to get more sales with Facebook Pixel?
Now, before wrapping up, let’s see how Facebook Pixel can improve your targeting, expand your customer base, and gain more conversions.
The best part about adding Facebook Pixel to Shopify is the amount of data it gives you. Specifically, it allows you to create Custom Audiences for your ads, which is basically a list you can then use for retargeting.
Retargeting is when you show Facebook ads specifically to customers who have visited your store. The goal is to show them new ads or new discounts and convince them to return to your store and make purchases.
Retargeted Facebook ads are 76% more likely to get clicked on than other ads.
Source: SocialMediaToday
That’s why retargeting is a powerful method for increasing traffic to your Shopify store. And the Facebook Pixel makes it easier.
1. Get creative with Custom Audience
So to add Custom Audience pixel on Facebook, follow these steps:
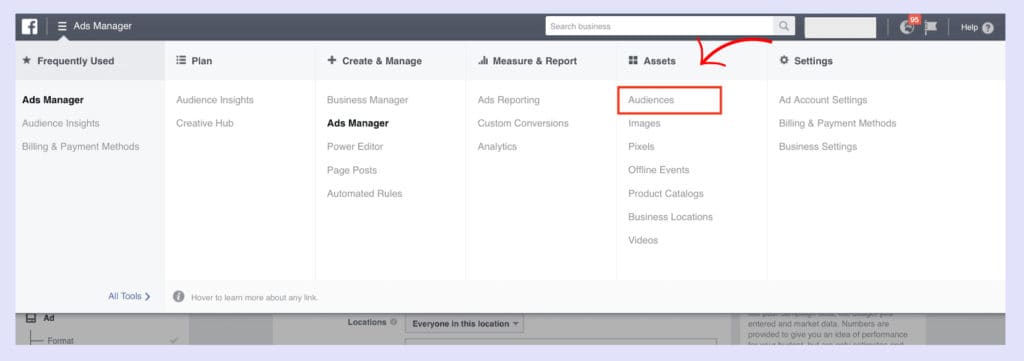
#1. Click on the top-right menu and select Audiences in Ads Manager.
#2. Navigate on Create Audience > Choose Custom Audience.
#3. Create a Custom Audience.
#4. From there, you can narrow your audiences down and create custom audiences using:
- Customer File: A list of your past customers’ emails.
- Website traffic: people who have visited your website and fired an event on your website.
- Engagement on Facebook: people who has interacted with your ads on Facebook (for examples: have clicked on an ad, have watched an ad video, etc.)

These audiences have obviously shown interests in your products before, so be a little bit creative with your ads and your chances of converting them will be high. For example, you can:
- Show discounts to people who have viewed your product to push for purchases.
- Show more creative product videos to those who like watching video ads.
- Show similar products to customers who have bought from you.
2. Play around with Lookalike Audience
An common issues of stores running ads is seeing lots of traffic but not enough sales. Why?
The answer is they’re possibly not targeting the ideal audience. That’s where Lookalike Audience comes into play. It automatically targets specifically the people similar to your existing customers, increasing the chance of conversions.
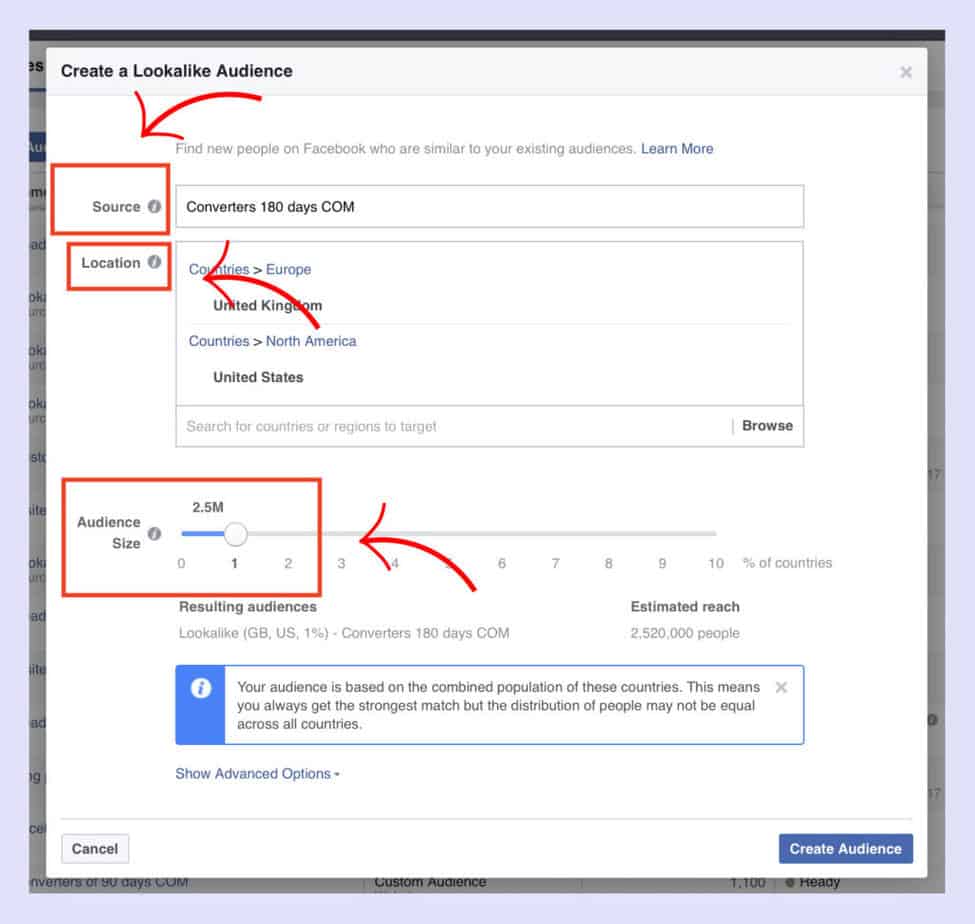
To create a Lookalike Audience, follow these steps:
#1. Create a Custom Audience to tell Facebook what type of users you want to reach.
#2. Next, select the Lookalike Audience from the audience creation menu.
#3. Choose a target country.
#4. Finally, select a percentage (1%-10%) of the targeted location from Facebook users.
? Tip for you: If your store is new or small, you should focus on audience-building ads first. Because retargeting with the Facebook Pixel is only effective when you’re tracking 1,000 or more actions per month.
Learn more:
16 Best Shopify Apps For Clothing Stores
3. Target customers on a specific page
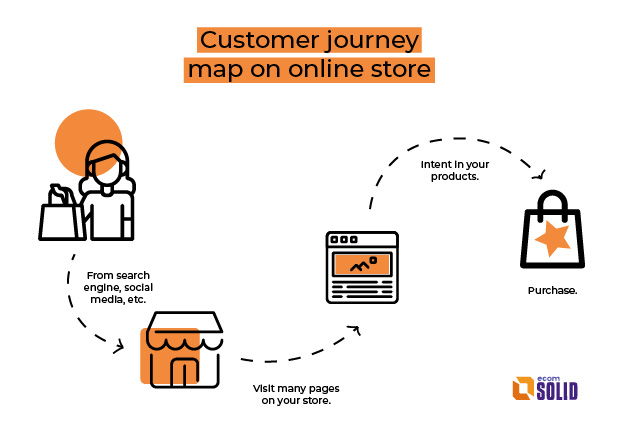
To make full use of Facebook Pixel, we are going to create more in-depth audience segments and target each set of visitors throughout their customer journey.
Imagine if a visitor spends a lot of time on a particular product page, you can show them an ad for that exact product and remind them to purchase. Likewise if a customer is already on the checkout page but abandon cart, you can show them discounts and get them to return.
Now, move to Facebook Analytics then follow these steps:
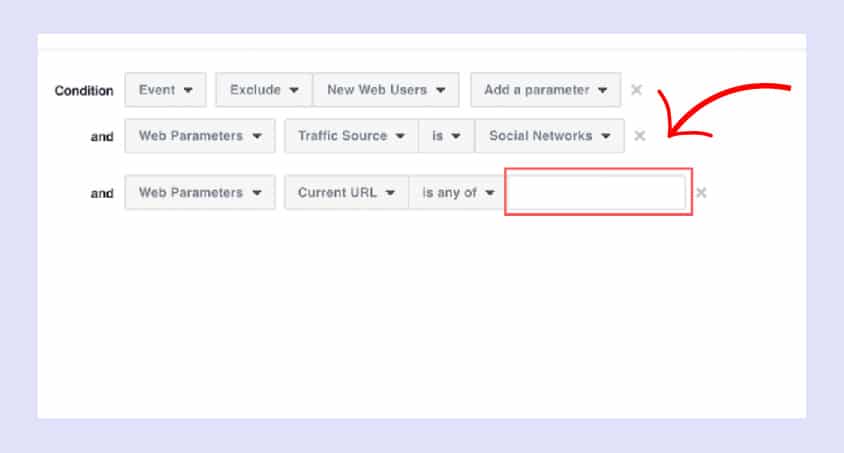
#1. From Facebook Pixel, select Create Custom Audience.
#2. Next, create a super segmented audience to target our buyer persona.
#3. Target “Social Networks,” exclude “New Web Users” and target those visitors who are visiting a particular page.
#4. Add in the URL to the particular page you want to target from our Shopify store.
A final word
Congratulations, you’ve successfully added Facebook Pixel to Shopify. You might feel a bit overwhelmed, it’s okay. The key is that you need to take time and do it correctly.
Here are the top examples of high-converting one-product stores for you to learn from and start building a great Shopify store yourself.
Explore more from successful case studies and you will find other great strategies. For example, did you know that a task as simple as removing Powered by Shopify may be a key to drive more sales?