In the 3rd Quarter of 2020, US e-commerce sales have more than doubled the growth registered in Q3 2019. Online selling is changing at a unprecedented pace.
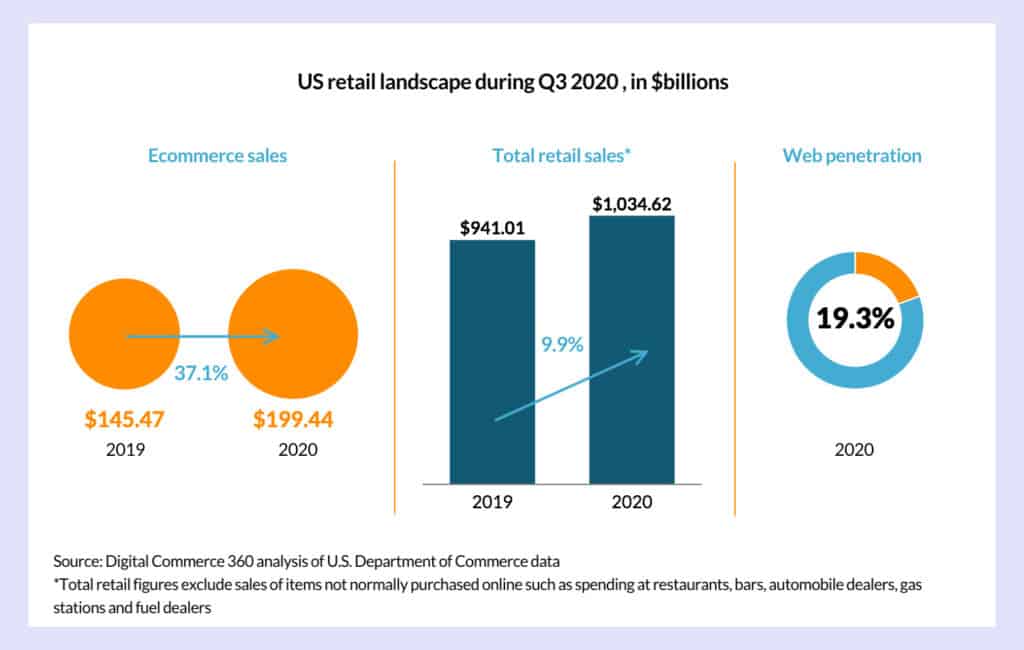
With such a huge growth, many sellers are forgetting the fundamental aspects of an online business like planning and tracking, and instead falling into the trap of chasing the latest trends.
That’s why we’ve put together this guide. We’ll give you proper way to add Google Analytics to Shopify and how to utilize it to actually grow your business.
Learn more:
Shopify Collabs: What Is It and How Do You Use It?
Shopify POS Go: What Is It? Why Should You Get It?
Try These 12 Mother’s Day Marketing Ideas and Watch Your Sales Grow
How to Set Up The Shopify eBay Integration?
7 Shopify Landing Page Examples from Top Brands
How to add Google Analytics to Shopify?
Users can directly copy code from Google Analytics to Shopify to connect and start integrating their data. However, before gathering valuable information from Google Analytics, you’ll need to ensure that you’ve got all the necessary tools.
Here are 5 steps to add Google Analytics to the Shopify store:
Step 1: Make sure Google Analytics hasn’t been enabled before
It’s vital to check if you’ve integrated Google Analytics into Shopify or not. Because if you enabled Google Analytics more than once, the data result wouldn’t be accurate.
If you are not sure whether you enabled GA before, follow these steps:
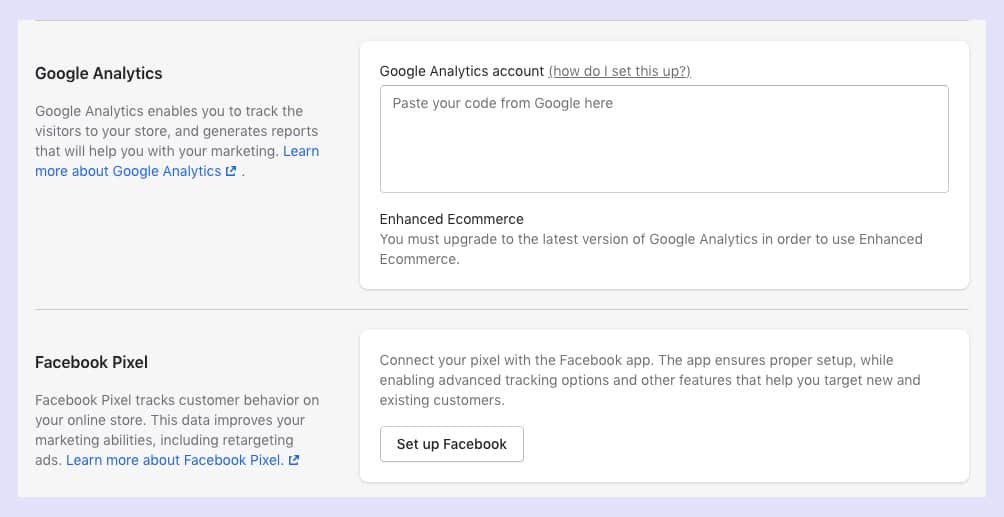
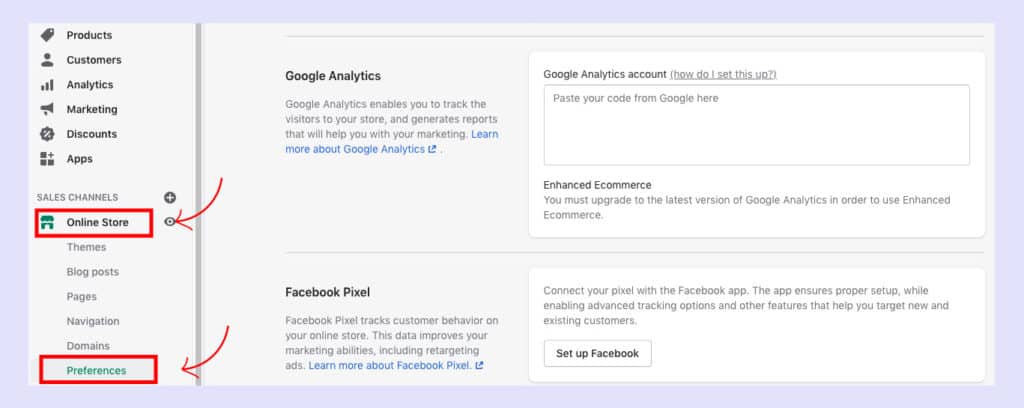
- Click Online Store > Preferences.
- Move to the Google Analytics section. If the box has the text “Paste your code from Google here”, this means you don’t have Google Analytics tracking.
? Notes: If you see the code beginning with UA- instead, then you have Google Analytics enabled already.
Step 2: Set up a new Google Analytics account
This step is for those who are new to Google Analytics. If not, move to the next step.
If you already use Google products, such as Gmail or Ads, then you can use the same account for Google Analytics. Otherwise, create a new Google account here.
Then the signup process is quite simple, follow these step-by-step instructions below:
- If you already have a Google or Gmail account, then you can use that to sign in.
2. Once you successfully log in to your Google account, you will be asked to provide an account name. You can choose any name you like.
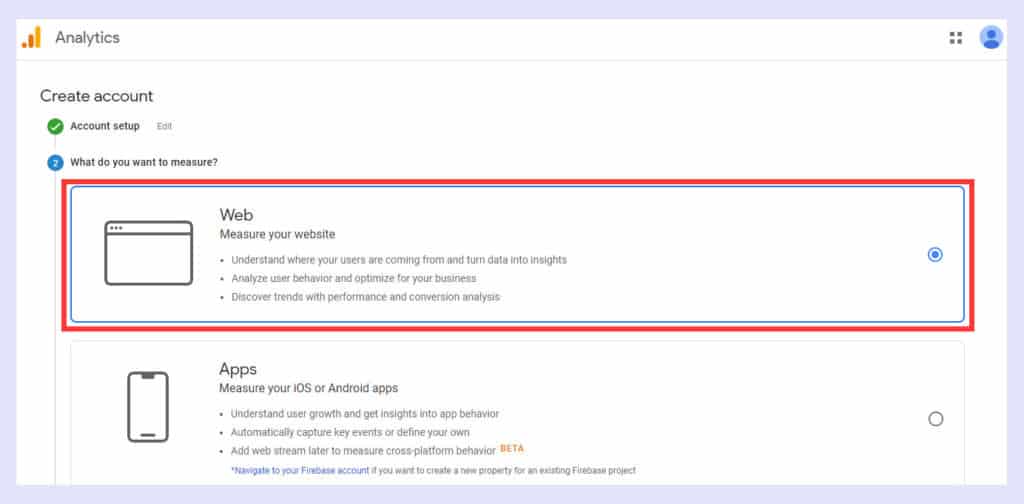
3. After that, you will have three choices to choose from. Make sure you select Web.
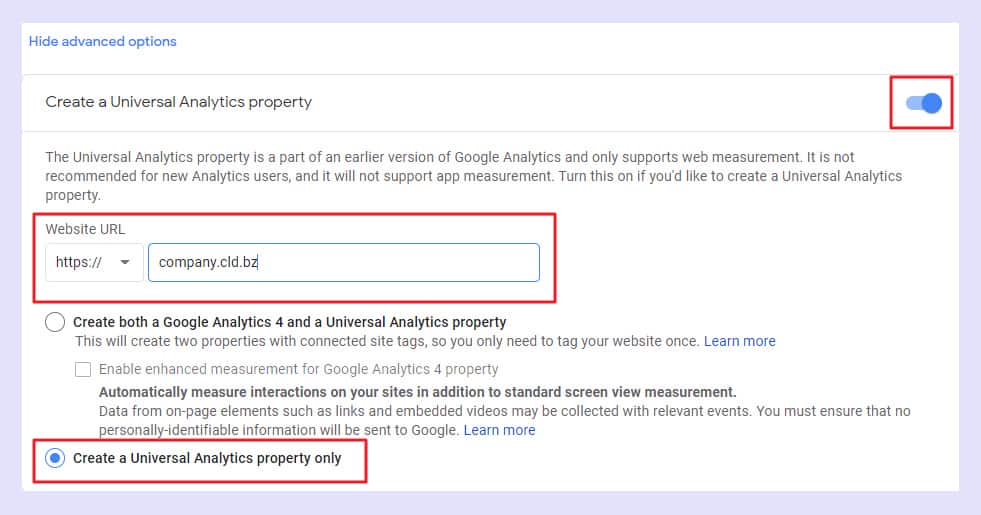
4. On the next screen, you need to create “Property details”. There are four elements you should note which are website name, website’s URL, country, and time zone.
5. Scroll down a little, you will see Show advanced options. Click it. Then select Create a Universal Analytics property > Create a Universal Analytics property only.
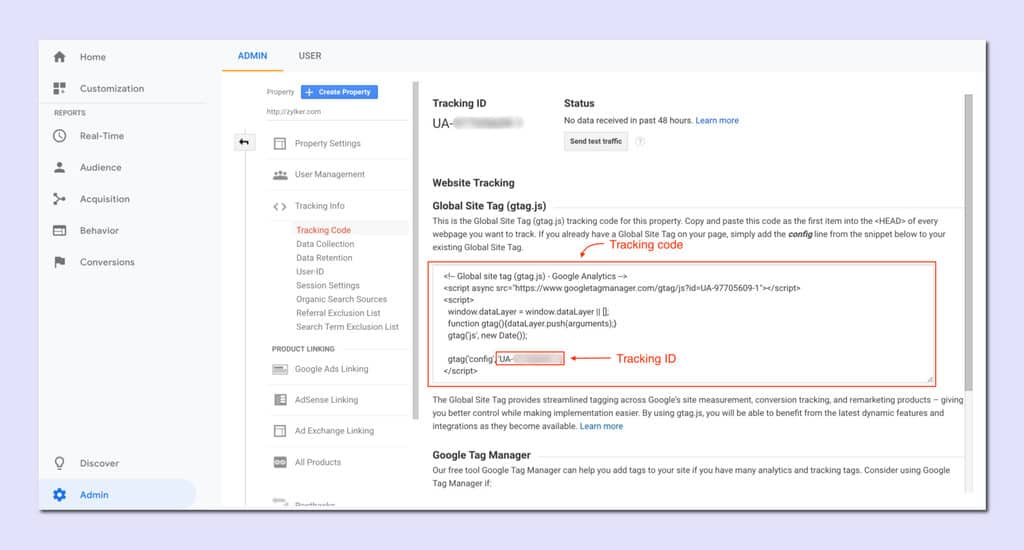
6. Click Next > Select the appropriate settings > Create the Property creation. Now you will able to access the Universal gtag.js tracking code snippet via the Tracking Info section in the Property column. And your UA-XXXX tracking ID will be on the top of the Property Settings page.
Step 3: Add Google Analytics tracking code to Shopify
You’ve already known the tracking code. Now follow these steps to add Google Analytics to Shopify:
- Once you saved the code, go to the Shopify store. From the panel on the left, select Online Store, and then select the Preferences option.
2. After that, locate the “Google Analytics” option. Then paste your Universal Analytics property code in the box.
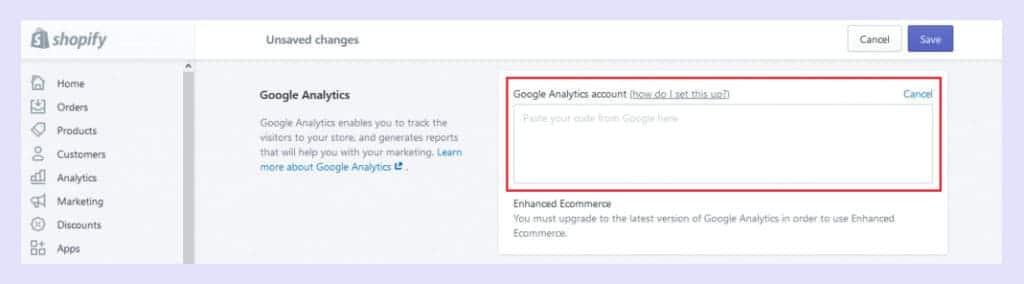
3. If you’ve added the correct tracking code in the Google Analytics account field, a UA code will appear under the Google Analytics section on your screen as follows.
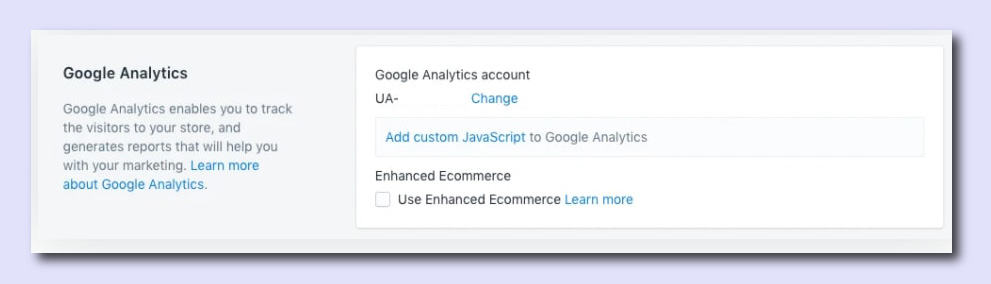
? Notes: There is one thing you have to notice. Google Analytics can’t track your Shopify data unless you remove the password protection page.
Step 4: Enable eCommerce tracking
So we have successfully set up Shopify Google Analytics conversion tracking. However, we are only getting reports about website traffic but not about e-commerce reports.
What to do next?
There are two different kinds of reports to set up Google Analytics to Shopify:
- Turn on the “basic e-commerce” tracking feature which allows you to monitor data related to revenue and transactions.
- Or enable the “enhanced e-commerce” tracking to monitor the visitors’ behavior.
? Notes: To avoid double tracking in your Google Analytics account, you just need to use one of the methods below.
Turn on the basic e-commerce
- Open your Shopify account.
- Admin > View > Click E-commerce Settings.
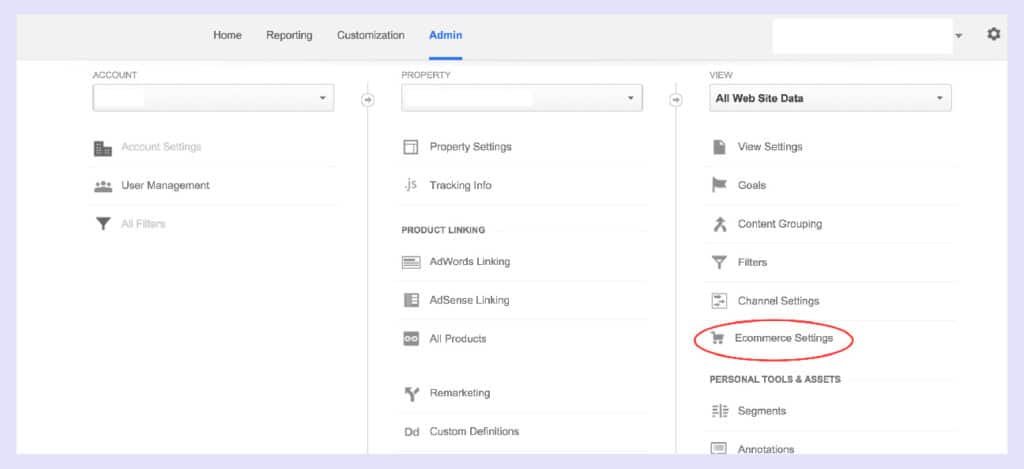
3. After clicking on Ecommerce Settings, first turn on the Enable Ecommerce toggle, then click the next step. In case you need more detailed tracking information, then enable turn on Enhanced Ecommerce Settings toggle and finally click submit.
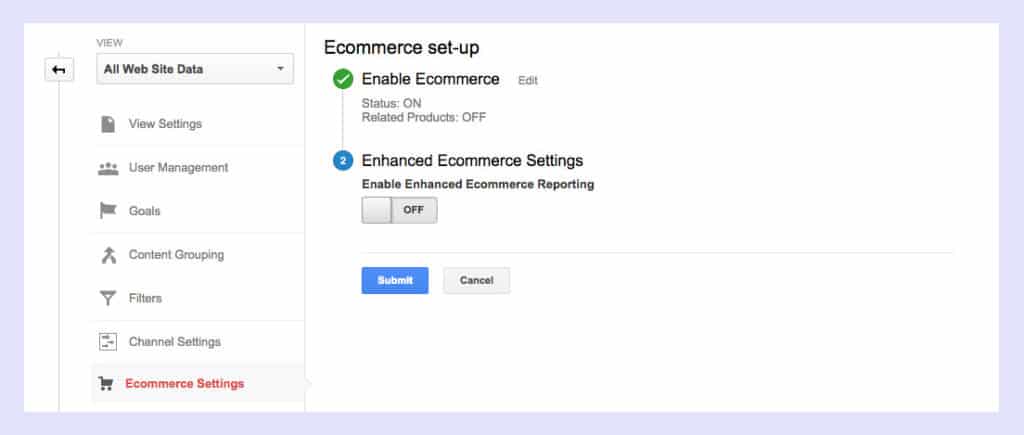
Now you need to wait 24-48 hours to see e-commerce reports in your Google Analytics account.
Enable the enhanced Google Analytics eCommerce tracking in Shopify
The enhanced ecommerce plug-in for analytics.js enables the measurement of user interactions with products on ecommerce websites across the user’s shopping experience.
Google Developers
In simpler terms, it gives you more data tracking specifically on how customers interact with your products. To enable this feature, do the following:
- First, you need to turn on the basic eCommerce tracking data on Google Analytics.
- Next, go to Shopify admin.
- Move to Online Store > Preferences.
- In the Google Analytics section, click the Use Enhanced Ecommerce checkbox.
- Click Save.
Setup Funnels And Goals in Google Analytics for Shopify
The ‘goal’ of this (no puns intended) is to track at which page buyers enter and exit your checkout process. Imagine if you can identify the one page where potential buyers often drop off, and you’ll be able to optimize that page for better conversion.
To set up your goal, follow these steps:
- Go to your Google Analytics > Admin > Goals.
- Create a new goal.
- Select “Custom”.
- Name the goal “Checkout Complete” and select the “Destination” goal type.
- Set the destination to your thank you page (also read here to see how to optimize and customize your Shopify thank you page).
- Turn on the Funnel option then add in the pages following the checkout steps of your store.
When finished, your funnel can be viewed in Goals > Funnel Visualization.
Bonus! What are the best practices for Google Analytics in Shopify?
To help you actually utilize the most of Google Analytics, we’ve gathered some of the best practices when using Google Analytics in a Shopify store:
- Not all data is helpful. For a Shopify store, metrics like bounce rates, exit rates, etc. can give you valuable insights into how your website is performing.
- The total average numbers only show the overall picture but little insight. This means you need to dig deeper into where segments and filters come into play.
- Essentially, you need to make sure that you are getting clean data. You shouldn’t rely on data that is, either way, smaller or bigger than most of the other data points.
Last but not least, all these reports, numbers and information is only valuable unless you make actionable plans out of the data.
Google Analytics vs Shopify Analytics?
Google Analytics provides a bird-eye view of what your customers really need instead of guessing what they might need.
Now, you may be wondering, “could I just use Shopify analytics?”. Well, you could. Unfortunately, Shopify analytics are limited by plan making it difficult to scale up and understand customers.
Simply put, if you are not on a higher Shopify plan, you will only get some of the reports you need. Adding Google Analytics is often better than paying the higher Shopify fees for the more expensive plans.
Another reason to use Google Analytics is that it is something of a golden standard in data collection and it has features specific to eCommerce stores.
That is why you need to connect Shopify with Google Analytics.
With the help of Google Analytics, store owners and managers can easily track all important data including:
- Track the number of sessions/purchases and unique sessions/purchases
- Calculate accurate customer lifetime value (LTV)
- Dive deeper with acquisition reports — analyze campaign performance, referrals, etc.
- Segment by user type to evaluate your visitors (and the potential ROI of retargeting them)
- Run conversion rate optimization (CRO) tests such as A/B testing
- Analyze checkout funnel drop-offs
- Track which landing pages generate the most revenue
- Monitor your target keywords and optimize your store messaging accordingly
- Use custom segments to see the difference in revenue between search terms
- Collect all the metrics in one place via integrations with other Google products, like GA4 to BigQuery, to create developed live performance dashboards
The list can go on. Shopify’s dashboard gives you a simple daily overview of sales and products sold. Meanwhile, if you spend hundreds of dollars on advertising, or investing in SEO, you need to add Google Analytics to Shopify.
Now comes the big question: How to set up Google Analytics for your Shopify store?
Wrapping up
Paying close attention to it and Google Analytics will provide you with a wealth of information, helping to improve the way you approach your Shopify business.
Additionally, if you are earning lots of traffic from Facebook, don’t forget to also set up Facebook Pixel for your Shopify store.